Unloading and Loading Data with Wizards |
 Previous |
 Next |
The Data Load/Unload wizards of the Oracle Database XE graphical user interface enable you to easily load and unload delimited text data to and from the database. The step-by-step wizards have the following features:
-
You can load or unload XML files or delimited-field text files (such as comma-delimited (.
csv) or tab-delimited files). -
You can load by copying and pasting from a spreadsheet.
-
You can omit (skip) columns when loading or unloading.
-
You can load into an existing table or create a new table from the loaded data.
-
When loading into a new table, the primary key can be taken from the data or generated from a new or existing Oracle sequence.
-
When loading into a new table, column names can be taken from the loaded data.
-
Each time that you load from a file, file details are saved in a Text Data Load Repository. You can access these files from within the repository at any time.
Limitations include the following:
-
The wizards load and unload table data only. They do not load or unload other kinds of schema objects.
-
You can load and unload to and from your own schema only. This is also true for users with administrator privileges.
-
You can load or unload only a single table at a time.
-
There are no data type limitations for unloading to text or XML files, or for loading from XML files. However, when loading from spreadsheets (through copy and paste) or from text files, only the following data types are supported:
NUMBER,DATE,VARCHAR2,CLOB,BINARY_FLOAT, andBINARY_DOUBLE.
This section contains the following examples of unloading and loading data with wizards:
Example: Unloading Data with the Unload Wizard
Suppose you want to unload the REGIONS table, which is part of the HR sample schema, so that it can be used in another application. Suppose also that you want to create a tab-delimited text file, and you want to save the data in a file called regions.txt.
To unload the REGIONS table:
-
Log in to the Oracle Database XE graphical user interface as the
HRuser.See "Accessing the Database Home Page" for information on getting logged in.
Note:
An administrator must first unlock theHRaccount and assign a password. See "Logging In as an Administrator" and "Locking and Unlocking User Accounts" for instructions.
-
On the Database Home Page, click the Utilities icon, and then click the Data Load/Unload icon.
-
On the Data Load/Unload page, click the Unload icon, and then click the Unload to Text icon.
The Unload to Text page appears, showing the Schema wizard step. This wizard step displays a Schema list, in which
HRis selected. Because you can unload from your own schema only, you cannot change this selection. -
Click Next.
The Table Name wizard step appears.
-
From the Table list, select
REGIONS, and then click Next.The Columns wizard step appears.

Description of the illustration exp_columns.gif
-
Select all columns by clicking and dragging or by clicking and shift-clicking, and then click Next. (You can also select a subset of columns. Deselected columns are excluded from the unload operation.)
The Options wizard step appears.
-
Complete the following steps:
-
In the Separator field, remove the comma if present, and enter a backslash and a lowercase T (
\t) to indicate that you want the tab character to be the field delimiter. (You can use any character as the delimiter.) -
Select the Include Column Names check box.
This causes the first row unloaded to be the column names, rather than the first row of data. You can use this first row to set column names when you load.
-
In the File Character Set list, select Unicode UTF-8.

Description of the illustration exp_options.gif
-
-
Click Unload Data.
A Save As window appears, with the file name
regions.txtfilled in. Depending on your browser, another window may precede the Save As window, asking you if you want to save or open the file. If so, take the option to save the file to disk. -
Save the file
regions.txtto the Desktop or to a directory of your choice. -
(Optional) Open the
regions.txtfile with a text editor or spreadsheet application to verify that theREGIONStable was unloaded properly.
Example: Loading Data with the Load Wizard
Suppose your application calls for a REGIONS table, where each row contains a region number and a region name. Suppose also that you previously unloaded region data from a desktop database system into a tab-delimited text file named regions.txt.
You want to use the region number field in each record as a business key but not as the primary key, and you therefore decide to have the Load wizard generate a numeric primary key for each loaded record.
|
Note: You can complete the following steps with theregions.txt file that you create in "Example: Unloading Data with the Unload Wizard".
|
To load the REGIONS table:
-
Log in to the Oracle Database XE graphical user interface as any user other than
SYSTEMorHR.To log out first, click the Logout button at the upper right-hand corner of the page. See "Accessing the Database Home Page" for information on getting logged in. If no database user other than
SYSTEMorHRexists, create one. See "Creating Users" for instructions. -
On the Database Home Page, click the Utilities icon, and then click the Data Load/Unload icon.
-
On the Data Load/Unload page, click the Load icon, and then click the Load Text Data icon.
The Load Data page appears, showing the Target and Method wizard step.
-
Under the Load To heading, select New table, and under the Load From heading, select Upload file (comma separated or tab delimited).
-
Click Next.
The File Details wizard step appears.
-
Complete the following steps:
-
Click Browse, select the
regions.txtfile, and then click Open. -
In the Separator field, replace the comma with a backslash and a lowercase T (
\t) to indicate that the field delimiter is a tab character. -
In the File Character Set list, select Unicode UTF-8.

Description of the illustration imp_fileinfo.gif
-
Click Next.
The Table Properties wizard step appears.
-
-
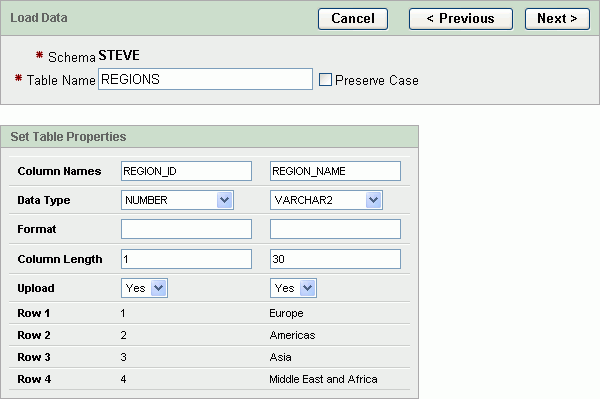
Complete the following steps:
-
In the Table Name field, enter
REGIONS.
Description of the illustration imp_tableinfo.gif
-
Accept the default (
Yes) in all Upload lists.Setting Upload to
Noexcludes the column from the load operation. -
Click Next.
The Primary Key wizard step appears.
-
-
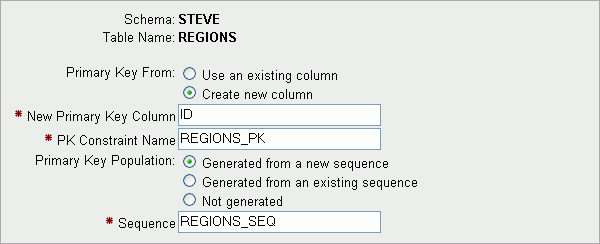
Complete the following steps:
-
Next to the Primary Key From label, select Create new column.
-
Next to the Primary Key Population label, select Generated from a new sequence.

Description of the illustration imp_pk.gif
These selections cause Oracle Database XE to:
-
Create an additional table column called
ID, which is used as the primary key forREGIONS. -
Create a new sequence called
REGIONS_SEQ. -
Use the values from the sequence to populate the
IDfield as each new row is added.
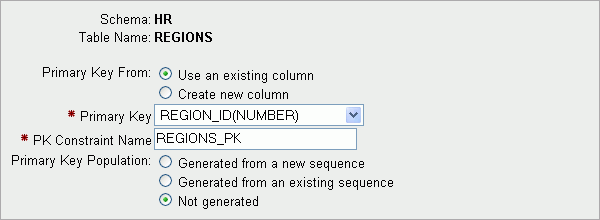
If you did not want to create a new primary key, and wanted to instead use the existing
REGION_IDfield as the primary key, you would do the following:-
Select Use an existing column.
-
In the Primary Key list, select
REGION_ID(NUMBER). -
Select Not generated.

Description of the illustration imp_pk_alt.gif
-
-
Click the Load Data button.
The load proceeds, and when it is complete, the Text Data Load Repository page appears, showing the
regions.txtfile at the top of the list of loaded files. -
Check the load status by looking under the
SucceededandFailedcolumns for theregions.txtfile.The numbers in these columns indicate the number of rows that were successfully loaded or that caused an error.